Preparation
- Look at the first eight minutes of this video, explaining how servo motors work and how you control these with an Arduino.
- Study the following introductionary texts on the (workings of the) Arduino:
Exercise 1: servo motor
Working with LEDs is fun and all, but sometimes we want some more action than just walking lights. In such a case we use actors instead of sensors. In this exercise, we are going to use a potentiometer to control the angle of rotation of a servo-meter. As always, this is just to introduce you to the general workings in the hope that you can use these techniques in one way or another in your own project.
Servos are clever devices. Using just one input pin, they receive the position from the Arduino and they go there. Internally, they have a motor driver and a feedback circuit that makes sure that the servo arm reaches the desired position. But what kind of signal do they receive on the input pin?
It is a square wave. Each cycle in the signal lasts for 20 milliseconds and for most of the time, the value is LOW. At the beginning of each cycle, the signal is HIGH for a time between 1 and 2 milliseconds. At 1 millisecond it represents 0 degrees and at 2 milliseconds it represents 180 degrees. In between, it represents the value from 0–180. This is a very good and reliable method. The graphic below makes it a little easier to understand.
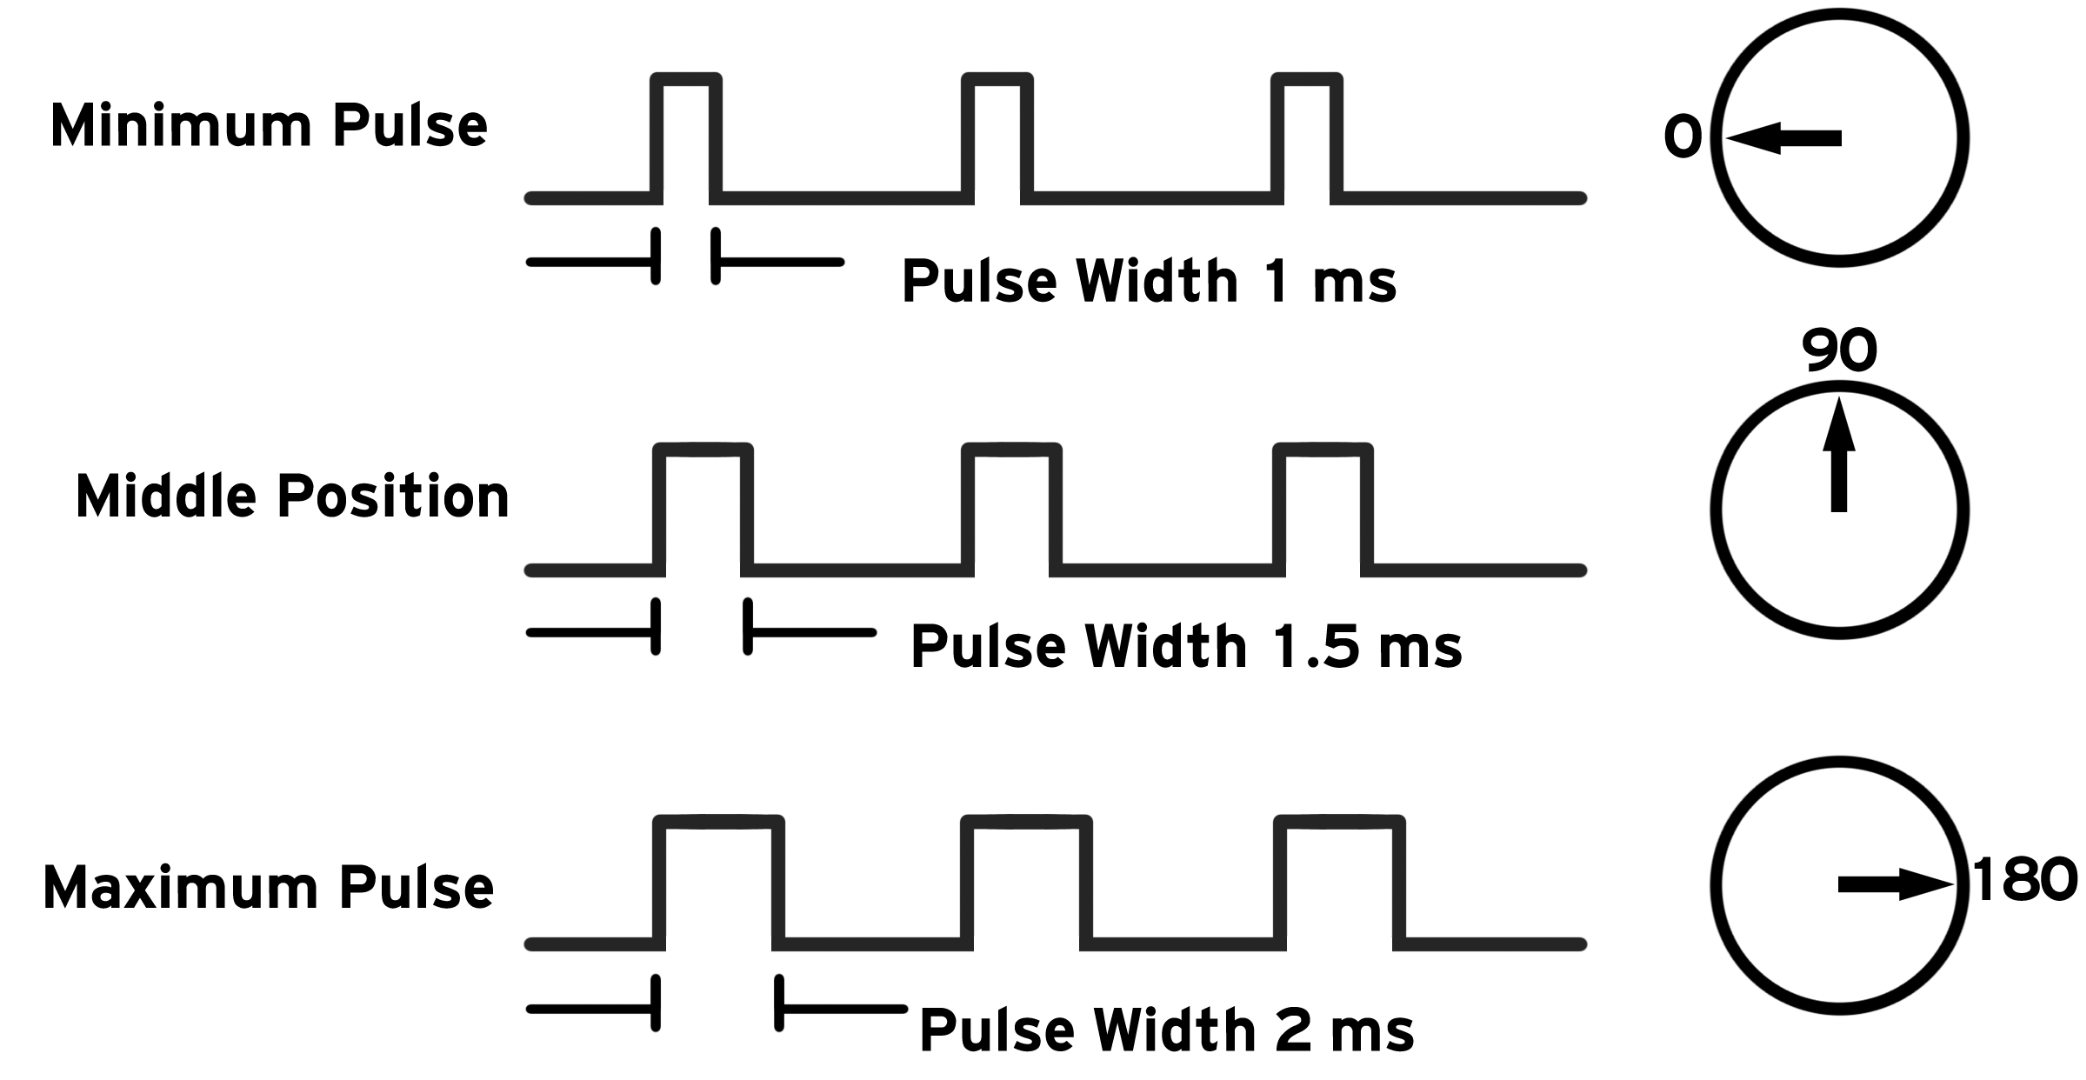
Luckely, we don't have to create all this machinery by ourselves: Arduino has a build-in library Servo, that we can use to our benefit. Have a look at the code below (which you can download here). Here, we are using this library to rotate the servo to the left and to the right every second.
// Include the Servo library
  #include <Servo.h>
  // Declare the Servo pin
  int servoPin = 3;
  // Create a servo object
  Servo Servo1;
  void setup() {
     // We need to attach the servo to the used pin number
     Servo1.attach(servoPin);
  }

  void loop(){
     // Make servo go to 0 degrees
     Servo1.write(0);
     delay(1000);
     // Make servo go to 90 degrees
     Servo1.write(90);
     delay(1000);
     // Make servo go to 180 degrees
     Servo1.write(180);
     delay(1000);
  }
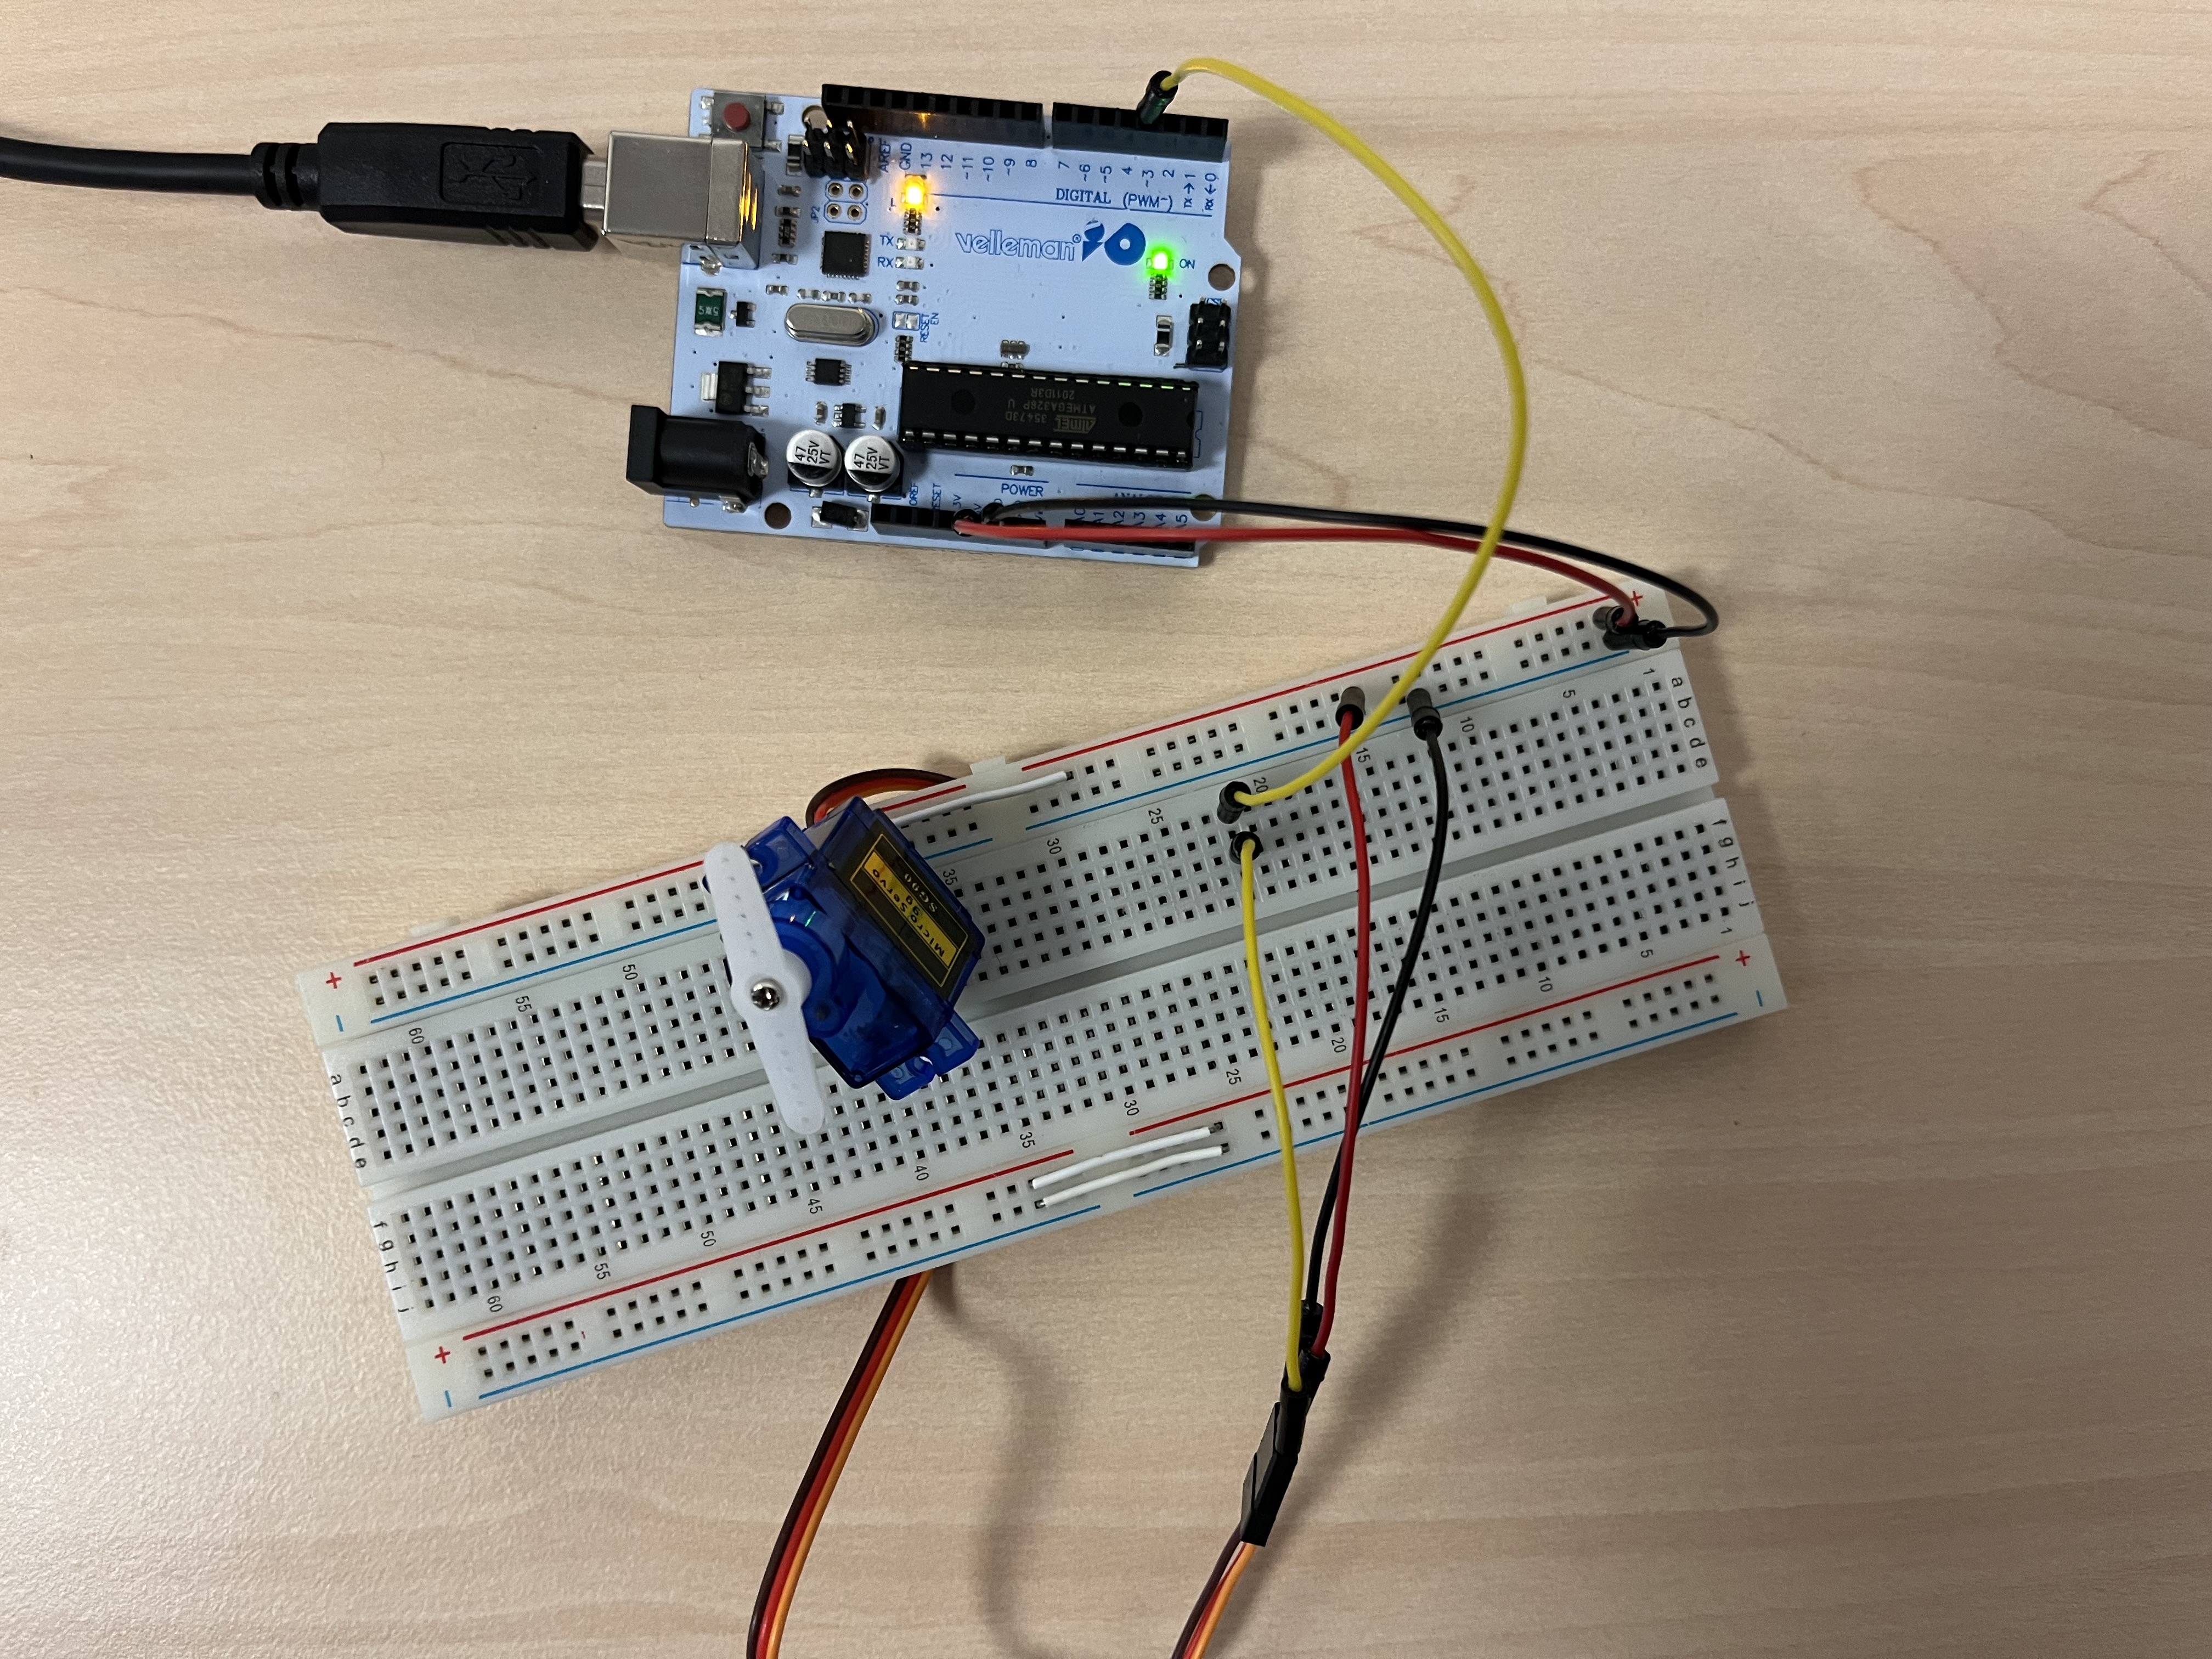
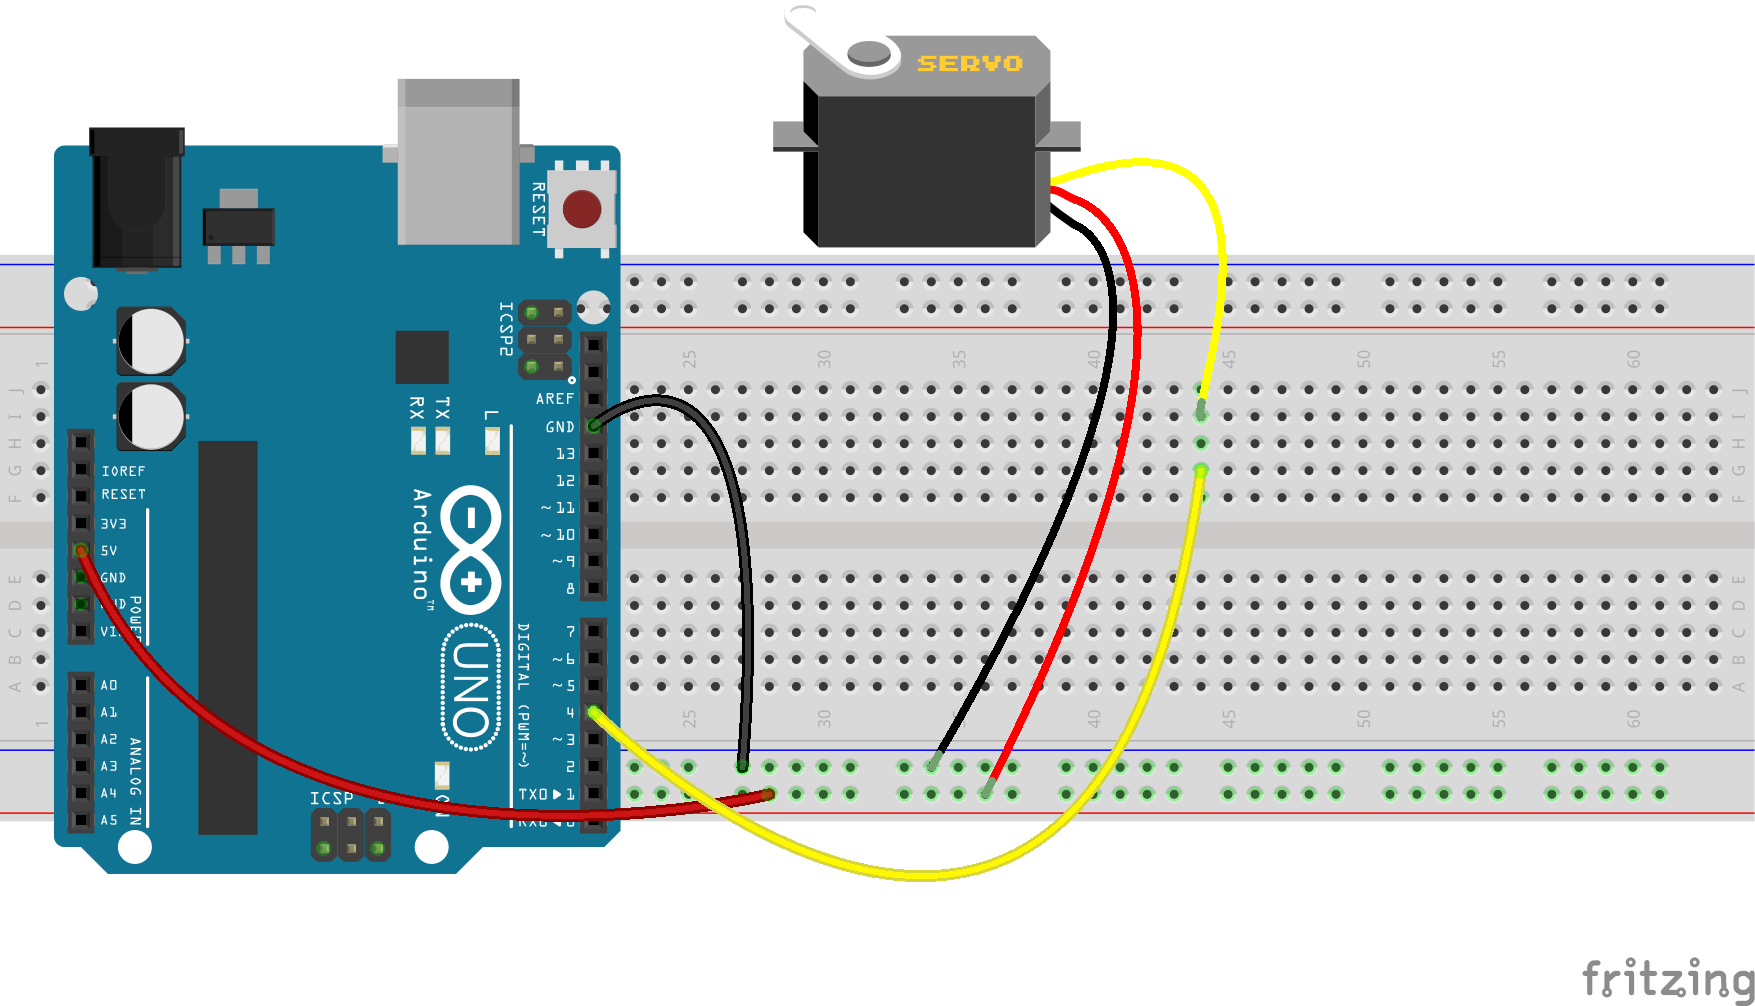
Realise the following setup on your breadboard and upload the code to your Arduino. Make sure you understand what is going on and why the system is doing what it is doing.
Exercise 2: More serial communication
Introduction
Last week, we already introduced the Arduino Serial Monitor to display the value of the potentiometer (or the sensor); however, we can also use the Serial Monitor to send data to the Arduino. In this first example, we will use that Arduino just to echo whatever is send to it. Because the Arduino is not doing anything else, we don't need to hook up a breadboard. Just copy-past the code below into your IDE (or download it download it here), upload it to the Arduino and type something in the Serial Monitor. Be sure you understand what is going on in the code; have a look at the documentation for Serial.read() as well.
String inputString = "";

void setup() {
  Serial.begin(9600);
  Serial.println("Please type something and hit ENTER");
}

void loop() {
  while (Serial.available()) {
    char inChar = (char)Serial.read();

    if (inChar == '\n' || inChar == '\r') {
      Serial.print("Arduino received: ");
      Serial.println(inputString);
      inputString = "";
    } else {
      inputString += inChar;
    }
  }
}
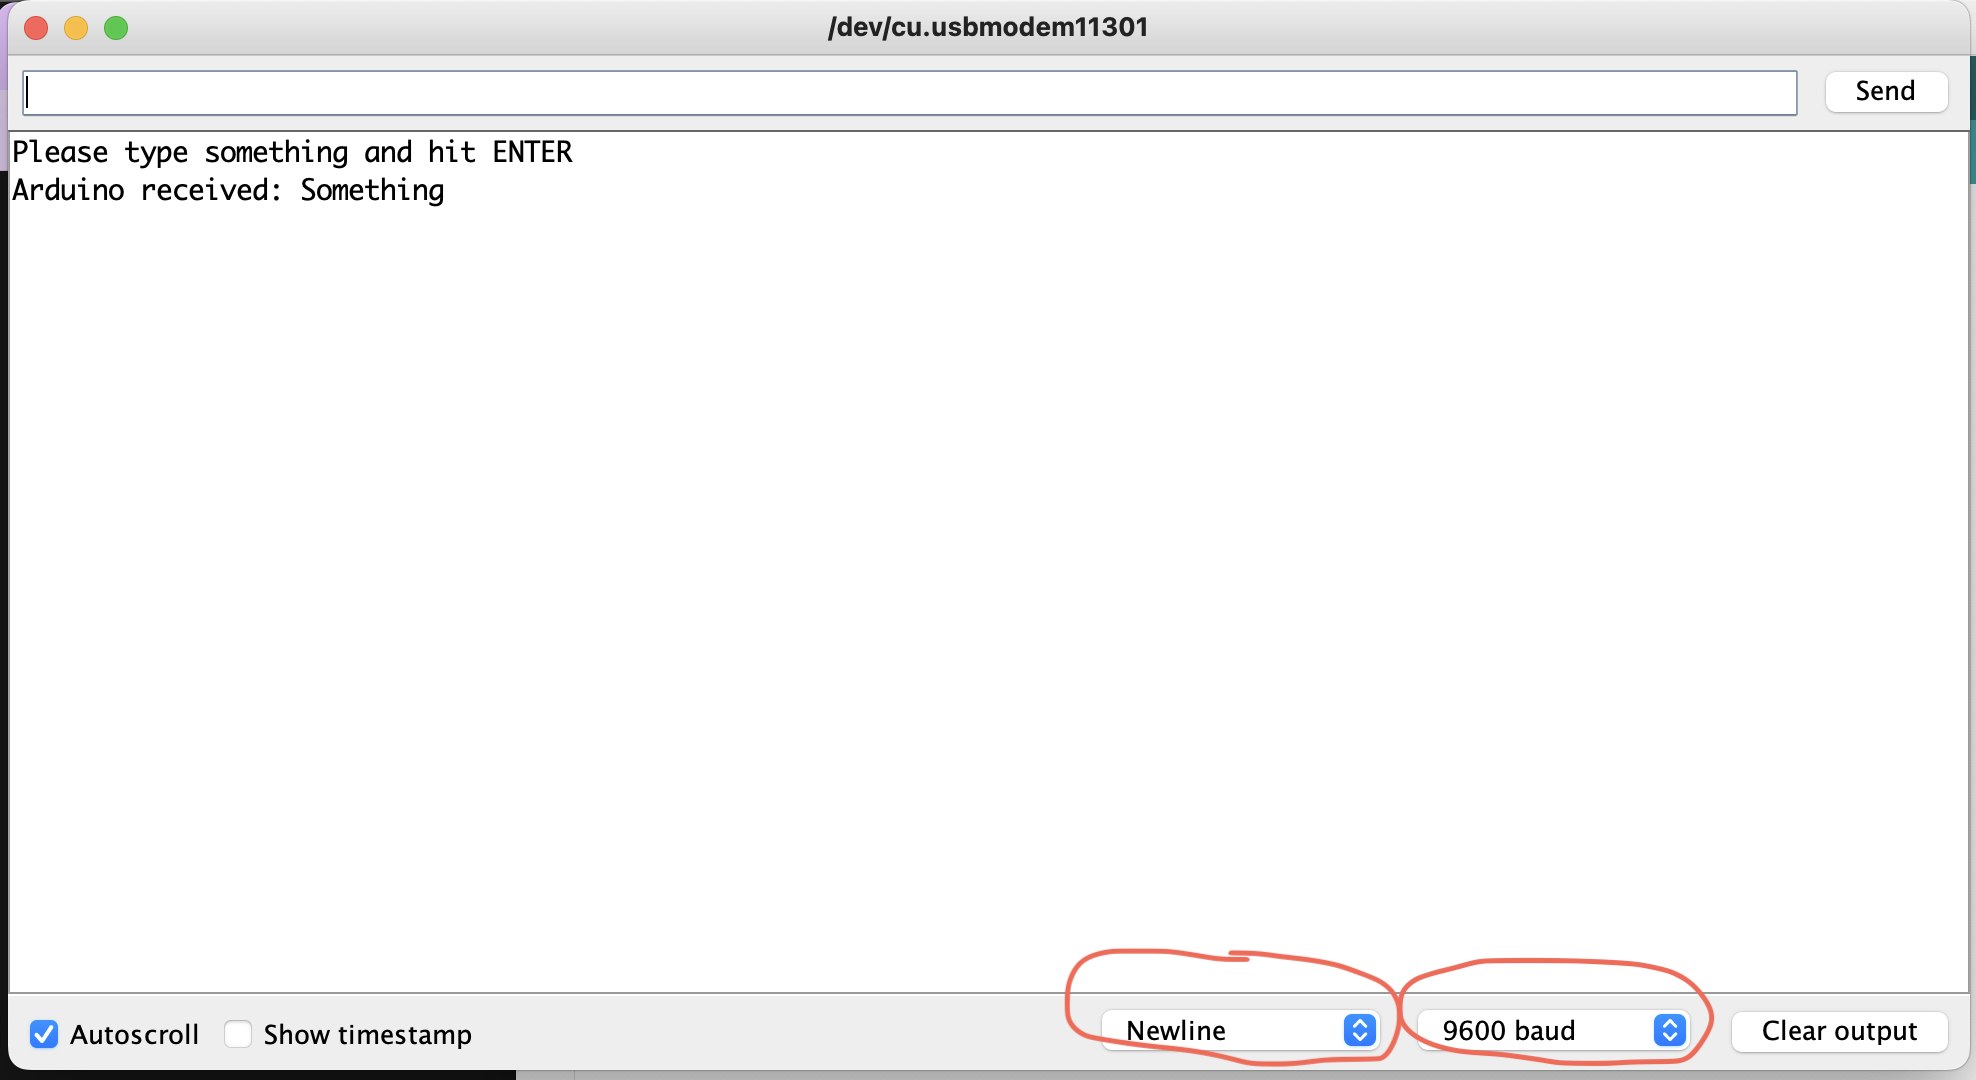
Please note that in order for this to work, you need to setup your Serial Monitor in such a way that it sends either newlines ('\n') or carriage returns ('\r') or both at the end of a transmission. Also, the baud rate of the Serial Monitor must be the same as the one you put on the Arduino (in line 4 of the code above). Have a look at the image below to see where and how.
Part 1
Now, create a breadboard with a few LEDs of different colors connected to different ports – make use of exercise 1 on ports and LEDs of the previous week. Now alter the code above to that you you can type the color of the LED you wish to put on. If you don't remember, have a look at the documentation for conditionals on the Arduino-API, the most important part of which is copied below.
if (condition) {
  //statement(s)
}
In this case, the condition should check which color is being received by the Arduino and the statements should put all but the chosen LED off.
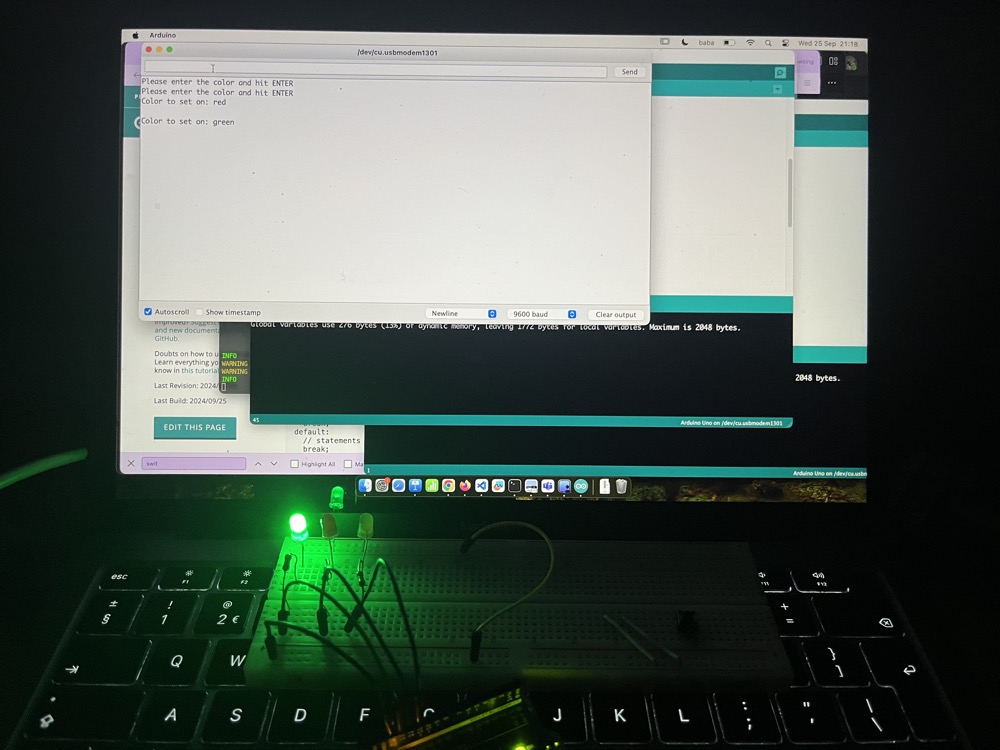
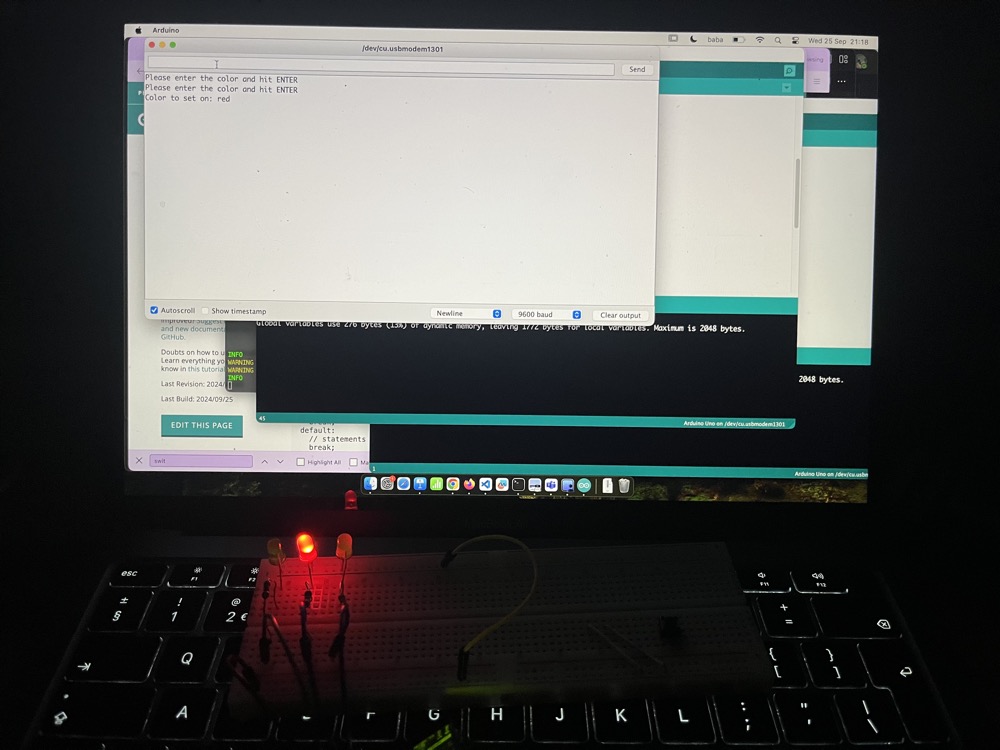
Part 2
Modify the code so that it is possible to switch more than one LED on, by separating the colors with a comma (','); e.g. when you want to put a red and a green LED on, you type 'red,green' in the Serial Monitor. You can make use of the method getValue(sting, seperator, index) that is provided below (download it here; just paste that code into your Arduino IDE, below (outside of) the loop-method):
void setup() {
  // your setup code
}

void loop() {
  // your loop code
}


String getValue(String data, char separator, int index) {
  int found = 0;
  int strIndex[] = {0, -1};
  int maxIndex = data.length()-1;

  for(int i=0; i<=maxIndex && found<=index; i++){
    if(data.charAt(i)==separator || i==maxIndex){
        found++;
        strIndex[0] = strIndex[1]+1;
        strIndex[1] = (i == maxIndex) ? i+1 : i;
    }
  }

  return found>index ? data.substring(strIndex[0], strIndex[1]) : "";
}

//source: https://stackoverflow.com/a/29673158/10974490

/* example usage:
  String demo = "red,green,blue"; // note the absence of spaces
  getValue(demo, ',', 0) // will return red
  getValue(demo, ',', 2) // will return blue
*/
As you can see, we agree not to allow spaces after the comma. If you want, you can change the method getValue to remote the trailing spaces, or use the method indexOf to check for a string without the commas. This is left as an exercise for the reader 😎.
Part 3
Now update your code so that instead of just having the chosen LED burning, it is actually blinking. We will expand on this last step in the next exercise.
IMPORANT: we are going to expand on this exercise in week 4, so don't disassemble it; or at least make sure you can reproduce it without trouble.
Assignment
TBD